5.3L Engine Rebuild Page 10


Figure 37. Here is piston number 2 going in. Position the crankshaft journal so it is as far away as possible, then insert the piston in the install tool
and push it in, using your other hand to guide the connecting rod down onto the journal. Remember to put the Clevite 2800B-1 Vinyl Connecting Rod Bolt Covers on the bolts before inserting it into the piston bore.

Figure 38. Piston assemblies numbers 1 and 2 are now installed, they were checked with plastigage, then the rod bearings were lubed up and the caps re-installed and torqued down. The torque specification is 15ft lbs, then another 75 degrees. Before going this far, do not make the mistake I made of not looking at the rod bearings before installing these two. They are marked upper and lower, and we had them on backwards and had to change them around.

Figure 39. All eight pistons are now installed in the block. Another milestone in assembly reached!
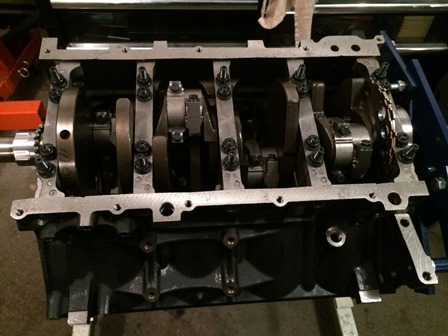
Figure 40. All the connecting rods have been checked. Lubricated with Clevite 77 2800B2 Bearing Guard, and torqued to specs.
| Pages: 1, 2, 3, 4, 5, 6, 7, 8, 9, 10, 11, 12, 13, 14, 15, 16, 17, 18, 19, 20, 21, 22, 23, 24, 25, 26, 27, 28, 29, 30, 31, 32, 33, 34, 35, 36, 37, 38 |
| <--Previous | Build Home | Next--> |
| Contact: Copperhead | As an Amazon Associate I earn from qualifying purchases | © 2019 |